Stable Diffusion is a group of AI image-making models from Stability AI that make images from descriptions. You can try one on a website, or install the Comfy Desktop app, download a model, and use it to make images on your computer.
Whichever way you choose, the basic steps are the same:
- Describe the image you want. People often call this description a prompt.
- Choose the image size and key settings.
- Generate several variations.
- Improve the result by asking for another version or changing just one part of the image.
This Stable Diffusion tutorial shows the two ways to get started, what image making feels like, and which settings are useful to know.
Key terms used in this guide: diffusion model, negative prompt, LoRA, and text-to-image.
Stable Diffusion for beginners: browser app or desktop app?
This table compares using Stable Diffusion in your browser with running it in a desktop app.
| Option | What setup involves | Cost | What you can change | What you need | Best for |
|---|---|---|---|---|---|
| Comfy Cloud (in browser) | Create an account; choose a ready-made setup | Five free runs; paid plans from $20/month | Change settings allowed by your plan | Internet connection | Trying more image-making options without installing an app |
| Comfy Desktop app (on your computer) | Install the app; download a model and a ready-made setup | App is free; your computer uses electricity | Choose models and settings; save setups to reuse | Computer with enough memory and free storage | More control over a setup you can keep using |
If you want a quick test before choosing a setup, try the Stable Diffusion public demo in your browser.
Start online: generate an image in your browser
The public demo runs Stable Diffusion 3.5 Large. We made both example images there on October 1, 2026. It requires no installation or model download, but you may have to wait for images and its limits or availability can change.
Use the public demo for a first image
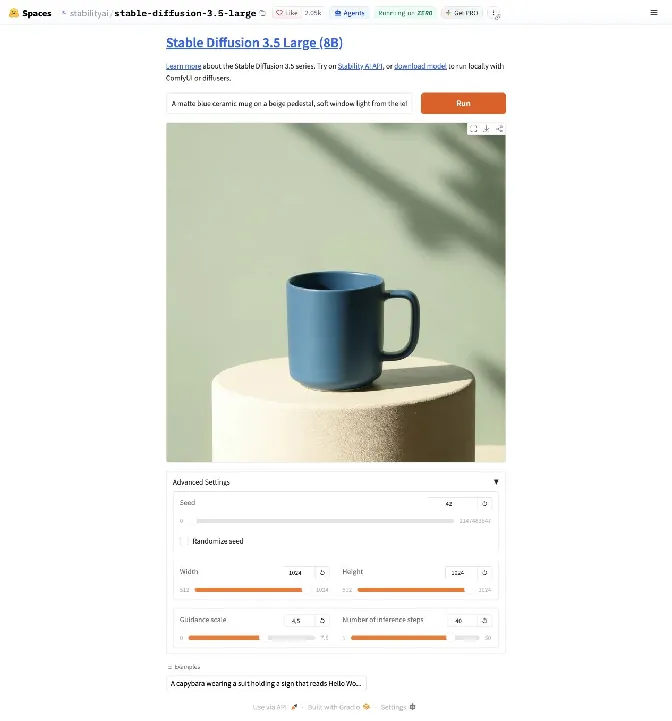
Our test: Stable Diffusion 3.5 Large, 1024 × 1024 pixels, 40 image-refinement passes, prompt guidance 4.5, and seed 42. The demo has no separate box for things to avoid or setting to choose an image-making method.
- Open the Stability AI demo page on Hugging Face and check that the model is Stable Diffusion 3.5 Large.
- Type the image description below in the Prompt box: A matte blue ceramic mug on a beige pedestal, soft window light from the left, pale green background, front three-quarter view, realistic product photograph, no logo.
- Open Advanced Settings. Set image size to 1024 × 1024, guidance to 4.5, and steps to 40. Turn off Randomize seed and enter 42 under Seed. The table below explains these controls.
- Select Run and wait for the image. Check the subject, lighting, layout, and any unwanted details.
- Change one part of your description and run it again. Select Download to save the image you prefer.
What the public-demo settings do
| Setting in the demo | What it changes | Our test |
|---|---|---|
| Prompt | Describes what you want to see in the image. | The blue-mug description above |
| Image size | Sets the picture’s width and height. Larger images may take longer to make. | 1024 × 1024 pixels |
| Guidance scale | Adjusts how strongly the model follows your description. | 4.5 |
| Number of inference steps | Sets how many rounds the model spends building the image. More rounds take longer and do not always improve it. | 40 |
| Seed and Randomize seed | With the same description and settings, the same seed usually gives the same image again. Turn on Randomize seed to try a new version each time. | Randomize off; seed 42 |
These numbers describe our Stable Diffusion 3.5 Large test, not recommended values for another model.
Keeping the seed fixed helps you compare descriptions, but it does not preserve the rest of the picture. If you want to keep the mug and change only its background, use an image-editing workflow described later in this article.
Use Comfy Cloud in your browser
- Open Comfy Cloud and create an account, or sign in if you already have one.
- Choose a ready-made image setup and check that it uses a Stable Diffusion model. Comfy Cloud offers other models too.
- Type a description (or add a starting image if asked), select Run, then review and save the result.
Comfy’s pricing page lists five free runs with no credit card required; it does not state a trial end date. After that, the paid options are Standard at $20/month, Creator at $35/month, and Pro at $100/month (USD, checked October 5, 2026). Creator lets you import your own models, while Pro allows longer runs. Paid plans include credits that are spent when you run an image setup; the number of images you can make depends on the model and settings. Comfy also lists lower monthly rates when you pay for a year upfront. Check its pricing page before subscribing because plans and allowances can change.
How to install Stable Diffusion on your computer
Check whether your computer can run it
The Comfy Desktop app runs on Windows 10 or later, or on macOS 13 or later on an Apple Silicon Mac. The guide lists 8 GB of main memory (RAM) as the minimum and 16 GB as recommended. The app itself needs at least 4.85 GB of free storage; downloaded models need extra space.
For the Stable Diffusion 3.5 Medium model used below, Stability AI says the model itself uses about 9.9 GB of graphics memory (VRAM) at full performance, before the memory used to read your description. That is a model figure, not a minimum guarantee for the complete Comfy Desktop setup. The all-in-one download is 11.6 GB, so leave extra storage space for the app and saved images. If you do not know whether your computer can handle that, try the browser demo first.
On a Windows computer with a separate graphics card, main memory (RAM) and graphics memory (VRAM) are different: 16 GB of RAM does not mean you have 16 GB of VRAM. Apple Silicon Macs share one pool of memory between the main processor and graphics processor, so the separate-card VRAM figure does not apply directly. Comfy Desktop can use a Windows computer’s main processor (CPU) when it has no suitable graphics card, but generation may be much slower. Larger images and generating several images at once can need more memory. Check the model’s requirements before buying hardware.
The easiest way to find out what Stable Diffusion feels like is the 3.5 Large browser demo above: type a description and see what it makes. Install Comfy Desktop if you want to keep your own setup and change more of its settings. This computer walkthrough uses 3.5 Medium, a smaller member of the same model family that ComfyUI offers as one download. You do not need to start with the older SDXL model. Medium and Large can make different images from the same description, so the two routes show the experience of using Stable Diffusion rather than a comparison of identical results. Our example images were made in the browser demo.
Install Comfy Desktop for your operating system
On Windows, download the Comfy Desktop installer and open the installer file (.exe). Follow the on-screen directions, then open the app.
On a Mac with an Apple chip (M1 or later) and macOS 13 or later, download the Mac installer file (.dmg), drag Comfy Desktop into Applications, and open it. The app installs the extra software it needs.
Download Stable Diffusion 3.5 Medium and make your first image
Comfy Org offers a single file with Stable Diffusion 3.5 Medium and the parts it needs to read your description. Its basic Image Generation setup supplies the image-making steps. You choose the downloaded model and write what you want to see.
In Comfy Desktop, select New Install. Name the installation, choose where its files will go, and select Standalone. On Windows, choose an SSD if possible and avoid the root of the C: drive.
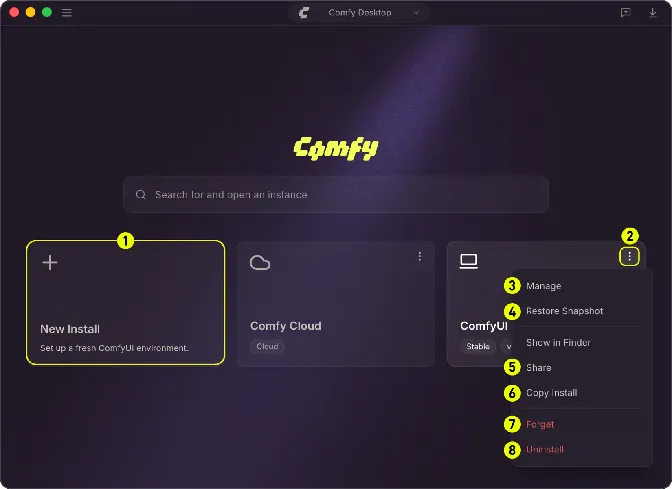
The highlighted New Install card starts a fresh setup. Source: ComfyUI’s official instance-management guide.
Wait for installation to finish, then open it. Comfy Desktop shows a template library after installation.
On Hugging Face, open Comfy Org’s Stable Diffusion 3.5 Medium all-in-one file. Check its model details and usage rules. Below the filename, click Download, then choose Download file from the menu to save
sd3.5_medium_incl_clips_t5xxlfp8scaled.safetensors. The model file is 11.6 GB, so allow time and storage space.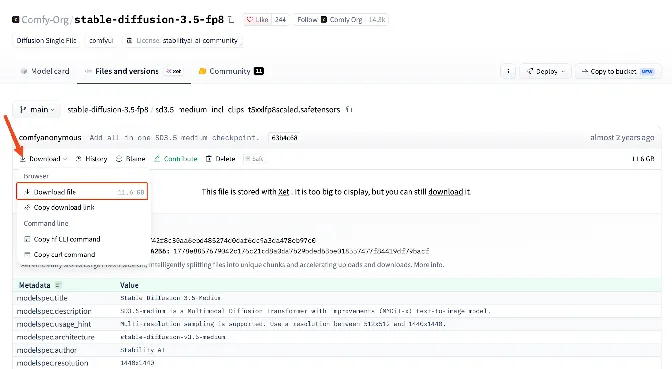
Choose Download file from the menu. Source: Comfy Org’s Stable Diffusion 3.5 Medium file page on Hugging Face.
In Comfy Desktop, open the menu at the top left, select Desktop Settings, then Storage. Open the main shared-models folder and put the downloaded file in its checkpoints subfolder. Return to the canvas and press R to refresh the model list. If the file does not appear, restart the installation.
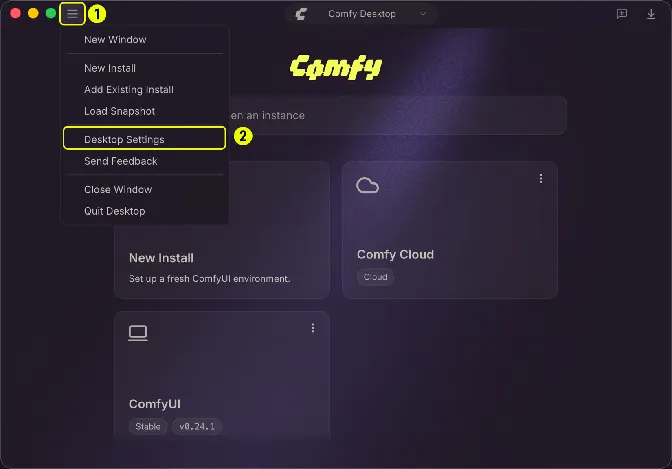
Open the top-left menu and select Desktop Settings. Source: ComfyUI’s official Desktop settings guide.
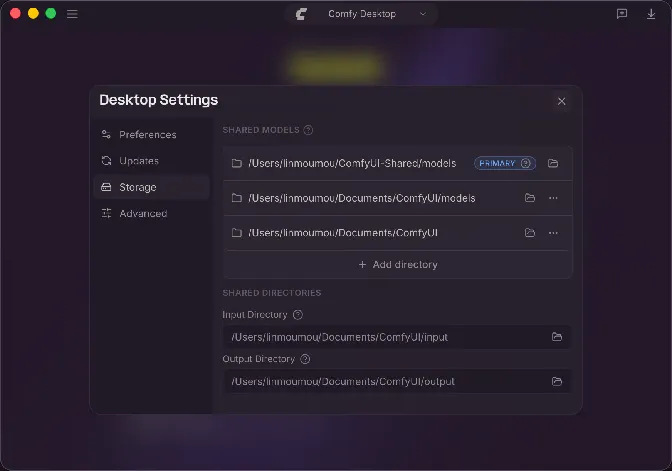
In Storage, click the folder icon beside the Primary models location. Your folder path may differ from the one pictured. Source: ComfyUI’s official Desktop settings guide.
In the template library, open the basic Image Generation setup. This is the ready-made set of steps that turns a description into an image.

The template library after installation. Source: ComfyUI’s official instance-management guide.
After the Image Generation setup opens, find Load Checkpoint (the box for choosing a downloaded model) and select
sd3.5_medium_incl_clips_t5xxlfp8scaled.safetensors. Type your image description in the positive prompt box. Keep the setup’s image size and other settings for the first run.Select Run or press Ctrl + Enter. When the image appears in Save Image, right-click it to save a copy. Choose Workflows → Export to keep the setup for another session.
What can you change when making an image in ComfyUI?
Comfy Desktop and Comfy Cloud do not present one fixed settings panel. You open an image-making setup (called a workflow) made of connected boxes, each with a different job. In ComfyUI’s official basic text-to-image example, Load Checkpoint selects the downloaded model, CLIP Text Encode boxes hold the image descriptions, and Empty Latent Image sets the blank picture’s size. KSampler receives those inputs and contains most of the generation settings. VAE Decode turns its output into a viewable picture, and Save Image previews and saves that picture. This example uses the older Stable Diffusion 1.5 model, so it explains a common workflow layout, not the exact screen or recommended values for the Stable Diffusion 3.5 Medium setup above.
These four KSampler inputs come from other boxes in that example:
| KSampler input | Where you make the choice | What it means |
|---|---|---|
| model | Load Checkpoint | Choose the Stable Diffusion model that makes the image. |
| positive | Positive CLIP Text Encode | Describe what you want in the picture. |
| negative | Negative CLIP Text Encode | Describe what you want to leave out, if the workflow offers it. |
| latent_image | Empty Latent Image | Set up the blank image, including its width and height. In an image-editing workflow, an existing image can be used instead. |
These seven controls are in KSampler itself:
| KSampler control | What you can change |
|---|---|
| seed | Pick a variation number. With the same model, description, and settings, the same number usually reproduces the same image. |
| control_after_generate | Choose whether the seed stays fixed or changes after a run, so the next run repeats or varies the result. |
| steps | Choose how many rounds the model spends building the image. More rounds take longer and do not always improve it. |
| cfg | Adjust how strongly the model follows your description. Start with the workflow’s value. |
| sampler_name | Choose how KSampler gradually turns random visual noise into the image over several rounds. Different choices can change the result; keep the workflow’s choice for a first try. |
| scheduler | Set how the noise-removal work is spread across those rounds. Keep the workflow’s choice for a first try. |
| denoise | Set how much of an existing image can change. Leave it at the workflow’s full-strength value for a new image made from text; lower values retain more of an existing image. |
Batch size is another choice in Empty Latent Image, outside KSampler: if the workflow includes it, you can ask for several images in one run, using more time and memory. Other workflows may arrange or name these controls differently.
Keep the SD3.5 Medium desktop workflow’s starting settings for your first run, then change one control at a time so you can see its effect.
Note: ComfyUI also has separate workflows for editing an existing image. They add controls such as denoise strength for how much to change, a painted mask for selecting one area, and options for upscaling, ControlNet, or LoRAs. Each workflow includes the boxes needed for its task: a basic text-to-image setup has no area to paint for inpainting, for example, while an inpainting setup does. The next section explains when to choose each one.
The faster SD3.5 Large Turbo model uses different settings: four refinement passes and guidance 0.0. Do not copy settings between model versions without checking.
After setup: describe your image and choose settings
Once the image model is selected, describe the subject, setting, layout, lighting, and look you want. For the mug, check its color, pedestal, light direction, and background.
Try these example descriptions and adapt them to your task.
Product shot
A matte blue ceramic mug on a beige pedestal, soft window light from the left, pale green background, front three-quarter view, realistic product photograph, no logo.
Illustration
Create a flat editorial illustration of a small bookstore on a rainy evening. Use navy and ochre, simple shapes, a wide composition, and warm window light.
Background or scene
Show a quiet coastal path at sunrise, with foreground grasses, distant cliffs, and soft mist. Make it a wide landscape with natural colors and no people.
Fictional portrait
Draw a chest-up portrait of a fictional adult explorer with short silver hair and a red raincoat. Use a neutral background and soft side light.
Optional: things to avoid (negative prompt)
watermark, unwanted text, duplicate objects, distorted proportions
In the Comfy Desktop Image Generation setup described above, put these words in the box labeled Negative Prompt, separate from your main image description. In Comfy Cloud, look for the same label in the setup you chose; if it is absent, skip this optional list. The public demo has no negative-prompt box, so skip it there too. Add only unwanted details you notice in an image.
How to edit and improve Stable Diffusion images
You can use all five options in ComfyUI, but they are not buttons in the basic Image Generation setup. Choose a suitable workflow for image-to-image, inpainting, upscaling, or ControlNet; a LoRA is an add-on you load into a compatible workflow. Some options need extra model files, and what you can use in Comfy Cloud may depend on the available models and your plan.
- Image-to-image changes the whole picture. Give the workflow an existing image and a new description, such as turning a product photo into an illustration. Its denoise or strength setting controls how much of the original image the new one keeps. Use it when you welcome broader changes to the image.
- Inpainting changes a selected area. Mark the background or another part you want to replace, then describe the change.
- Upscaling makes a finished image larger. Run the image through an upscaling workflow when you need more pixels for a larger display or print. Inspect the result at full size because added detail may look wrong.
- ControlNet guides the layout of a new image. Supply an outline, depth image, or pose guide to influence where elements appear. It is useful when the position or shape of a subject matters, but it needs a suitable ControlNet workflow and model.
- A LoRA adds a style or subject in ComfyUI. It is a small add-on file that you select in the Load LoRA box of a compatible image workflow. Use one when you want to repeat a visual look across images.
If you are editing a real photo, the AI photo editing guide shows how to sequence object removal, generative fill, and upscaling, then check the result at full size.
Check model safety and usage rules before commercial use
- Model downloads. Download models from the official publisher when possible. Some older model files can run code when opened. Hugging Face explains this risk. The
.safetensorsfile type avoids that particular risk, but still check who published the file and what you are allowed to do with it. - Model licenses. Check the usage rules for the exact model you download. Stable Diffusion 3.5 uses Stability AI’s Community License. If you later try another model, check its terms separately.
- Business use. If you download and run Stable Diffusion 3.5 for your business or clients, Stability AI requires you to register for commercial use. Businesses with less than $1 million (USD) in combined annual revenue can use the model commercially without a license fee. If your business and its related companies exceed that amount, you need a separate Enterprise license. Stability AI does not publish a fixed Enterprise price; you can request a quote.
- Image-generation websites. If you build a website that runs Stable Diffusion 3.5 for visitors, you are responsible for the model license. The Community License covers hosted services: register for commercial use, apply the revenue limit to your business and related companies, give users a copy of the license, include its required notice, display “Powered by Stability AI,” and follow Stability AI’s Acceptable Use Policy. Visitors do not have to register with Stability AI or meet its revenue test just to use the model as a built-in feature of your website, but they still need to follow your website’s terms and Stability AI’s Acceptable Use Policy. If you use Stability AI’s hosted API instead of running a downloaded model, its separate API terms and prices apply.
- Consent and safety. Use fictional people for practice. Obtain consent before generating real likenesses, avoid deepfakes and explicit content, and follow the platform’s content policy.
- Copyright. Being allowed to use or sell an image does not automatically mean you can stop someone else from copying it. Stability AI says you own your output as between you and Stability AI, to the extent the law allows, but that does not guarantee copyright protection. In the U.S., a prompt alone does not make an AI-generated image copyrightable. Your own creative edits or arrangement of images may be protected, while purely AI-generated parts are not. If protecting an image matters to you, keep a record of your edits and check the rules where you plan to use it. For more, see who owns AI-generated images.
How to fix common model problems in Comfy Desktop
Start with the error message, then check the matching row below. The diagnoses and main fixes come from ComfyUI’s How to Troubleshoot and Solve ComfyUI Model Issues guide. The simpler alternatives are suggestions for beginners using models on their own computers.
| What you see | What may be happening | What to try |
|---|---|---|
| The downloaded model does not appear in Load Checkpoint | Comfy Desktop cannot find the file in its model folders | Open Storage to check the model folder. Make sure the file is in its checkpoints subfolder, then press R to refresh the model list or restart the app. |
| The setup says a model is missing | The saved setup calls for a model file you have not installed | Read the missing-model message to find the file name. Download that model and put it in the folder ComfyUI specifies. If you are experimenting with a new model, begin with its official template or example setup. |
| Generation fails with a model-mismatch or tensor-size error | The setup may combine model parts from different families, such as SDXL and SD 3.5 | Return to the official setup for the model you chose. Check that any extra model parts are made for the same family. |
| The model file will not open, or you see Error while deserializing header | The download may be damaged, or the computer may lack disk space to load it | Check free disk space and download the model again from its publisher. |
| Switching models or starting generation takes a long time | Loading a large model from a slow drive can delay the start | If your models are on a hard drive, move them to an SSD if you have one. |
| You see CUDA out of memory | The model needs more graphics memory than is available for that run | Try a smaller model or use Comfy Cloud. ComfyUI’s model-issues guide also lists advanced low-memory options for manual installations. |
When the image generates successfully, choose Workflows → Export to save a copy of the connected boxes and their settings. If later changes stop the image from generating, choose Workflows → Open and select that saved file to return to the version that worked. The downloaded model stays in its model folder; exporting the workflow does not include it.
How to fit Stable Diffusion into your image workflow over 30 days
Try this practice plan in short sessions that fit your week. Save your first image and its description. When you edit the image, change a setting, or try another app, compare the new result with that first image to see what changed.
- Days 1-7: Choose an online option or the desktop app. If you prefer to run Stable Diffusion on your computer, install Comfy Desktop and set up the model using the steps above. Then make one simple product or scene image and save its description and settings.
- Days 8-14: Change one thing at a time, such as the background. Note what changed and what changed by accident.
- Days 15-21: Try editing a picture or changing one selected area. Decide whether you would use that feature again.
- Days 22-30: Look at the images you made and the effort each one took. Decide whether you want to keep using Stable Diffusion for your work images.
If you decide not to continue with Stable Diffusion, try your saved description in another image app. Use the AI image tools guide to find options for the images you need. If you choose DALL-E, the DALL-E walkthrough shows how to adapt your description. For a closer look at two other options, read the Nano Banana 2 vs FLUX 3 guide.
Image apps and features change, but you can choose which ones deserve your attention. The FLUX 3 overview shows how one image model family is expanding into video and audio. In a September 2026 community discussion, some users described feeling worn out by constant technical changes; others were happy with simpler setups. Try a new feature when it solves a problem you actually have.
Compare tools by the kind of session you want
Stable Diffusion gives you a choice of image models. You can test one in a browser, or download a model and use Comfy Desktop to choose the model, image-making setup, and settings yourself. The desktop route gives you more to adjust, but takes more setup.
Midjourney works through its website: enter a description in the Imagine bar, review the images, then make variations or use its editor. Its style references help you carry a visual look across new images. You do not need to download an image model.
ChatGPT Images works through a conversation or a ready-made template. With ChatGPT Images 2.5, introduced in September 2026, you can upload or make an image, describe what to change, and ask for further edits in the same conversation. You can also select an area to edit. This suits you if you would rather explain a revision in words than adjust a model setup.
Try the same image description in two tools. Compare the pictures and how much work it takes to get the result you want.
Build your image skills as the tools change
Start with one image and one revision. Judge the output and effort, then go deeper into Stable Diffusion or practice another image tool.
If you want to go deeper into Stable Diffusion, Coursiv has a dedicated course with short lessons and built-in practice that fit a busy schedule. As image tools change, you can return to learn about new features or explore other AI tools that may help with everyday work. Explore the AI learning program, or review the AI Certificate Program for certificate of completion details. Choose the next lesson around something you want to make or improve.
FAQ
These answers address the practical questions left after a first trial.
Do people still use Stable Diffusion?
Is Stable Diffusion free?
Yes. Comfy Desktop and the Stable Diffusion 3.5 model used in this guide are free for personal practice. If you use the model for work, Stability AI’s Community License requires registration and sets a US$1 million annual revenue limit for free commercial use; see the commercial-use section above. You still provide the computer and electricity.
Comfy Cloud, the browser-based ComfyUI app, offers five free runs, then paid plans with usage credits. The number of images you can make depends on the setup you run.
What do you need to run Stable Diffusion on your computer?
How do you run Stable Diffusion online?
Can you use Stable Diffusion images commercially?
Is it safe to download Stable Diffusion models?
.safetensors file when available, and read its usage rules. Check extra software add-ons too; a safer file type does not make every download trustworthy.